

By Subutai Community Manager Felipe Fonseca and Subutai’s GitLab Blueprint creator Marco Silva
Say hello to the GitLab Blueprint
So, you are concerned about the future of your Git repositories, following the huge movements the market has seen this week. You might have heard of another open source alternative, the GitLab community edition. But you don’t want to spend more money to pay for cloud services or spend more time learning how to install and setup GitLab in your server. Here’s where the Subutai GitLab blueprint comes in handy – enabling you to deploy GitLab on your peer-to-peer cloud.
In a nutshell, blueprints are enhanced templates designed to reduce system administration overheads by simplifying the deployment of cloud environments in the Subutai platform. If you are a Subutai Bazaar member, you might have come across blueprints on the Products page. Instead of setting up an environment from scratch, and then manually downloading and configuring GitLab, blueprints do all of these for you in the backend. Want to learn more about the Subutai platform? More info here: https://subutai.io.
Here’s what you need
Subutai users, with Bazaar accounts and peers, can skip this part and go straight to the walk-through below. First time users have to create an account on Subutai Bazaar. To do so, follow the guidelines on our Getting Started page. Just so you know, we are obsessed with security and privacy, so don’t forget to install the E2E browser plugin (all lightweight and open source, of course), which we developed for managing PGP keys. Registration is free and you even get to earn GoodWill, our internal Bazaar token.
With your Bazaar account set up, you can select the peer where you want to deploy the blueprint. From the Tools menu, go to the Peers page where you can select a peer and add it to your Favorites list. You will use that later during the blueprint set up. If you want to use your own peer, here are the instructions and guidelines, https://docs.subutai.io/Products/PeerOS_toctree.html.
Let us walk you through it
Once logged in to Bazaar, it’s just a matter of following these simple steps:
1. From the Tools menu, access the Products page.
Browse through the list on the Products page, where you can gain access to blueprints that can be deployed to any peer running our software, anywhere in the world.
2. On the Application Blueprints tab, click the GitLab blueprint icon or name.
If you want to review the inner structure of the blueprint, before deploying it, click View. Published blueprints come with full specifications so that they can be scrutinized by the community.
3. Click Build.
4. Set your variables.
The variables are quite straightforward, starting with names for the environment and container. Be sure to choose unique names to differentiate from other ones that you have or might want to build later. For the domain name, choose the subdomain through which you will access your GitLab instance. Free subdomains of “envs.subutai.cloud” are available for now. You can enter a new subdomain by clicking Add new. If you want to specify a container size, you may do so. Those who plan on hosting several projects may choose either the Large or Huge size.

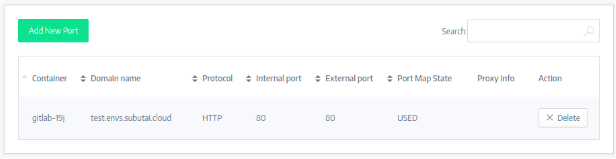
The next screen about Ports only informs you that the system will automatically point your selected subdomain to the proper container. You can click Next to continue.

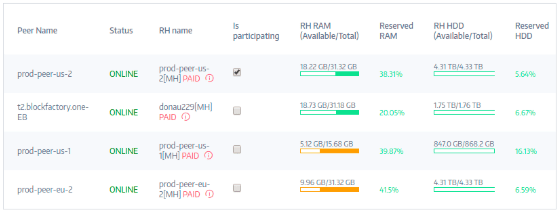
5. Select the peer where you want to run the environment.
Now is the time to decide where to deploy the blueprint. Select the peer that meets the requirements for your environment in terms of resources, geography, performance, and price (in GoodWill).
6. Click Finish.
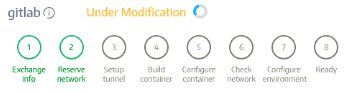
Wait for the build to finish. You are redirected to the Environments page where you can monitor the progress, as the contents of the blueprint are downloaded automatically and deployed to the container.
It might take a few minutes, but it’s worth it!
7. Access and set up your GitLab admin account.
Want to see it live? Use the domain name that you have set up earlier in the Variables screen. You will see that as a link in the Domain Name column on the Environments page.
When you click the link, you will see the GitLab page where you must set the password for the administrator account or the root user. Once logged in, you may register other accounts.
So, there you go – a functional instance of GitLab deployed on a P2P cloud. You can start transferring your projects and look forward to creating new ones. Enjoy it!
Some important post installation notes:
We recognize that due to constraints about the way the Internet works nowadays, you cannot run your own email server in a sustainable and effective way. Your GitLab instance will work fine without an email server, but email will probably be needed for certain tasks. For instance, when one of your users forgets her password and needs a password recovery link to be sent. Or when the user wants to receive email notifications about changes in repositories they follow. What we recommend is that you create an account on a commercial SMTP server, where you can set up the credentials afterwards. GitLab provides documentation on how to do that here.
GitLab is only one among the various open source software that has been integrated into a blueprint for easy deployment on P2P cloud infrastructure. Pretty cool, right? If you want, you can contribute to our growing blueprint collection. Check out our Blueprint Hackathon. (Hint: We’re awarding GoodWill in exchange for coming up with quality blueprints.)
